


Game Science’s Black Myth: Wukong took the world by storm upon its release in August 2024. Adapted from the 16th-century Chinese literary classic Journey to the West, the game not only amazes with its gorgeous, immersive locations and loving nods to the source material, but also with its massive collection of awe-inspiring bosses.
Although stumbling into bosses is a given, some require a bit more legwork to get to than others. In this article, we’ll be delving into all the secret bosses in Black Myth: Wukong, ranking them from ones you’ll hardly break a sweat fighting to those that will have you tearing your hair out.
Daoist Mi

Despite having two phases, Daoist Mi is arguably the easiest boss the Destined One will lock horns with. Found in the secret area called Purple Cloud Mountain in Chapter 4, triggering the boss fight requires you to complete a little side quest set by the boss himself. However, if you skip Daoist Mi and go on ahead to defeat Duskveil, you’ll lose your chance to fight the Daoist Mi and receive a new spell.
You’ll have to speak to the Daoist Mi first, before fetching the Violet Hail for him. As soon as you give it to him, the boss fight begins. Essentially, the Daoist Mi boss is easy to stagger, with attacks that are not difficult to dodge. The second phase is slightly harder, as he transforms into a worm guai and spews poison damage, but using the Pluck of Many spell will easily overwhelm him and end the fight quickly.
Giant Shigandang

Found in Chapter 6, unlocking the Giant Shigandang boss fight means following a series of steps all the way from Chapter 1. You would need to collect the Skandha of Form, Skandha of Feeling, Skandha of Thought, and Skandha of Choice. Collecting them will immediately trigger the boss fight and have you fighting possibly the largest boss in the game.
Despite its great size, its moveset is limited. You only have to watch out for its wide swings and avoid the shockwaves it makes by jumping. At some point, the boss will rest for a few moments, giving you the chance to shatter the crystals on its fist. Doing so will deal massive damage to its life bar and clinch you a swift victory.
Elder Jinchi

The secret boss of Chapter 1, Elder Jinchi can be found at the Ancient Guanyin Temple after ringing all three bells throughout the map. Although the Wandering Wight has given you a taste of what to expect, Elder Jinchi is surprisingly easier than even that notorious early boss. The two have the same movesets, but what makes Jinchi a walk in the park is that you don’t even need to waste your gourd to replenish your health. The zombie-like thralls walking about the arena will heal you every time you kill them, but it’s essential to kill as much as you can before Jinchi uses them to heal up as well.
Green-Capped Martialist

Found in the extremely well-hidden Melon Field in Chapter 3, the Green-Capped Martialist is actually the Treasure Hunter you encounter several times after hopping off Turtle Island. His moveset is quite simple to wrap your head around, as it largely consists of him swinging his bladed hoop around and sending it wheeling about the arena. Halfway through the fight, he whips out two hoops wreathed in fire, so equipping the Fireproof Mantle is useful for negating fire damage. Once defeated, Maitreya will give the Spell Binder spell as a reward.
Four Heavenly Kings
The final set of bosses in the game’s secret ending, the Four Heavenly Kings represent some of the most epic boss fights in video game history. After defeating Erlang, the Sacred Divinity, the Destined One shifts into his Stone Monkey form to battle these powerful gods.
A relatively simple fight, these four thankfully share one health bar, but it’s best to deal with them one at a time. Although you don’t have access to your gourd, every heavy attack or finisher replenishes your health. Without a doubt, Black Myth: Wukong certainly starts and ends with a bang.
Shigandang

The Shigandang boss hides in plain sight and only activates once you’ve collected all six Buddha’s Eyeballs in Chapter 2. It shares the same boss arena as the Stone Vanguard boss, and you can actually awaken Shigandang and have the two bosses battle it out. However, as Shigandang always ends up winning, it’s the perfect time to get a feel of its moveset. From basic swipes to delayed attacks, this boss is as aggressive as it is unrelenting.
Fuban

One of the most cinematic battles in the game, Fuban is a giant beetle fought in Chapter 2’s secret area, the Kingdom of Sahali. The only boss in the area, Fuban is quite challenging to battle on its own due to its extensive health bar, hard-hitting attacks, and the annoying ability to burrow into the ground and launch itself into the air.
But midway through the fight, the Yellow Wind Sage enters the fray and fights alongside you. This makes Fuban infinitely easier to tackle and ends the battle much faster than if you’d gone at it alone. Although this fight is optional, one of the rewards is crucial for defeating the final boss of Chapter 2.
Black Loong

One of the most unique boss fights in gaming history, the Black Loong is found behind a sand wall in Chapter 2. The key to triumphing is paying attention to the boss music, as it beats its mace to the beat and causes electric shockwaves throughout the arena. All you need to do is ensure you hop onto one of the many boulders around the arena in time to avoid getting killed. The rest of its movesets, however, are easy to get used to and dodge.
Red Loong

The Red Loong is easily missed, as you need to get Loong Scales, which is an item found in Chapter 2. Once obtained, you will be able to access the Red Loong’s arena behind a waterfall in Chapter 1. This boss requires a lot of patience due to its habit of flying around and meting out devastating AoE attacks. You would need to stock up on some Shock-Quelling Powder to stand a chance against this foe.
Mad Tiger
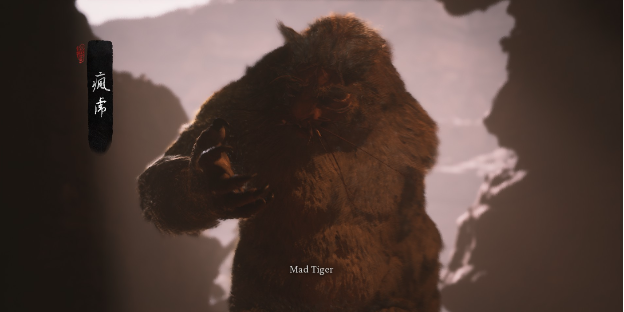
If Game Science’s aim was to create one of the most stress-inducing boss fights ever, then they succeeded with Mad Tiger. After completing Chapter 2’s Old Rattle-Drum side quest, you’ll be led to a well in Sandgate Village, where you’ll find the Mad Tiger waiting at the bottom. As soon as the fight starts, you’ll be hit by a barrage of increasingly aggressive attacks. Not only is he unimaginably fast, but he also deals extreme damage, even dealing an AoE attack that could one-shot you if you’re not careful. Ultimately, you can’t let your guard down even for a minute when fighting this boss.
Yin Tiger
Found in the Zodiac Village accessible after obtaining the Ruyi Scroll, the Yin Tiger is the gruff blacksmith found in the very back of the village. Aside from crafting and upgrading your gear, there’s also the option to challenge him to a duel. The Yin Tiger doesn’t let you pause to catch your breath, as he’s able to phase from one end of the arena to another.
He has extensive reach with his greatsword, with the tendency to power up before swinging his weapon. However, this fight does teach you how to time your dodges, with the added reward of being able to craft the Iron-Tough Armour upon defeating the Yin Tiger.
Duskveil
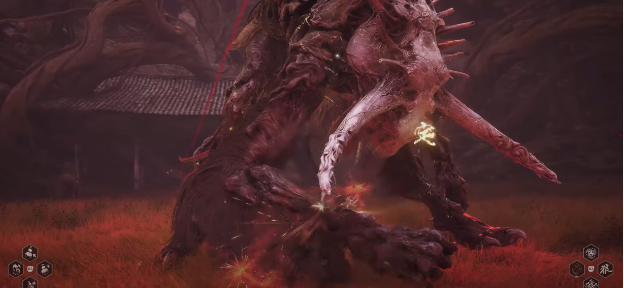
The final boss of Purple Cloud Mountain, the Duskveil is considered to be one of the hardest bosses in the entire game. The boss has two phases, and although optional, you have to defeat it if you want to obtain the vessel that’ll help you against the final boss of Chapter 4.
The first phase is simple enough to familiarise yourself with, but the second phase is the one you have to watch out for. The boss could now emit a red mist that could severely damage you, as well as release homing projectiles to slice you to bits. It might take you a few tries, but the rewards are well worth it.
Bishui Golden-Eyed Beast

The secret boss of Chapter 5, reaching Bishui requires you to defeat all the Five Element Carts to access Bishui Cave. You’ll need an ample stock of Body-Cooling Powder, since Bishui will lob successive fiery attacks, from charging to smashes and swipes. Moreover, Bishui has the coolest boss arena in the game, which allows you to travel deeper into another part of the cave to face the boss. However, the boss will be infinitely easier to tackle as it would now wield ice instead of fire.
Although defeating this boss doesn’t grant you a vessel to help you fight Yaksha King, it does provide more context surrounding the Red Boy’s origins.
Yellow Loong
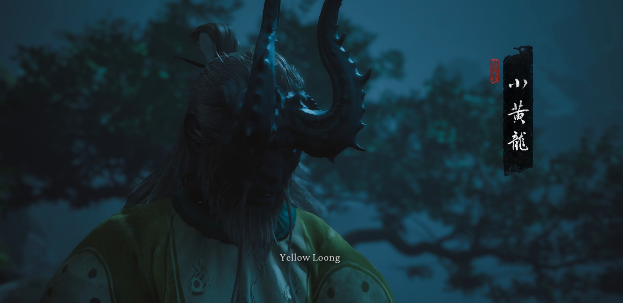
The last of the loong bosses, the Yellow Loong only appears once all of the other loong bosses have been defeated. Located near Chapter 4’s The Relief of the Fallen Loong shrine, the Yellow Loong instantly puts you on guard with his long combo sequences and delayed attacks. Similar to the Yin Tiger, this boss fight really teaches you how to evade and use your spells at the right time, especially when he does his lightning rushes or slams.
Once defeated, you’ll unlock the must-have Golden Loong Staff as a reward for defeating all four Loong brothers.
Scorpionlord
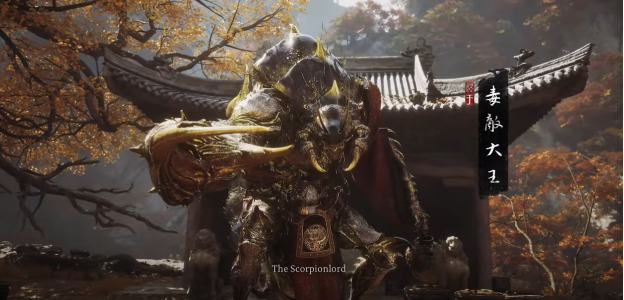
Initially, the Scorpionlord can be found drinking wine and telling you to leave him alone. A boss fight starts the moment you smash his wine barrels. As you might guess, the Scorpionlord deals poison damage with every attack, so stocking up on Antimiasma Powder is necessary. One of this boss’s signature moves is spinning while flinging poison from his stinger, as well as charging and attempting to smash you with his oversized pincer. Despite his relentless, acrobatic moveset, using spells like the Pluck of Many will go a long way.
However, note that if you don’t fight the Scorpionlord and go straight to the Duskveil, he will help you battle against the latter during the first phase only.
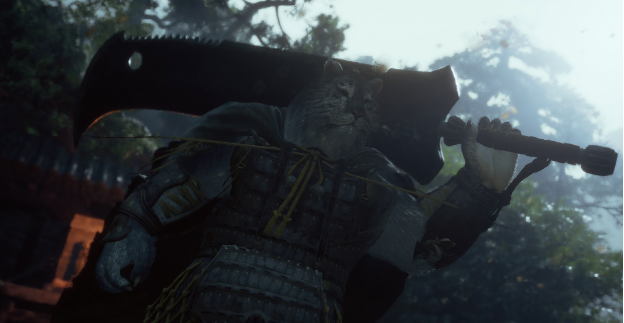
Erlang, The Sacred Divinity

The Destined One faces Erlang Shen, a path towards a secret ending that requires you to defeat all the secret area bosses in the game. Predictably, Erlang, the Sacred Divinity is a beast in battle, with a rechargeable shield that’s a pain to break through. Backed up by the Xu Dog, Erlang’s giant axe makes an appearance, along with moves he used in the introductory scene of the game. However, it’s noted that Erlang is vulnerable to the Plantain Fan vessel obtained at the end of Chapter 5.
Although Erlang’s second phase is much easier to handle, facing him means the end of your journey as the Destined One.
Did our guide help you find and defeat all the secret bosses in Black Myth: Wukong? Which one of the secret bosses in Black Myth: Wukong did you find to be most difficult to defeat?


You must be logged in to post a comment Login